Using GitHub Projects for Agile
GitHub is a repository management service that has taken over the development world over the past decade becoming the de facto place to host your software product. While GitHub revolutionized the way developers collaborate on code, it did not have a proper built-in project management tool until the introduction of GitHub Projects in 2021. Unlike traditional project management tools that are separate from the code repository, GitHub Projects integrates seamlessly with GitHub Issues and allows developers to easily keep track of their tasks and the overall progress of a software project. GitHub Projects enables teams to create an adaptable spreadsheet, task board and roadmap that incorporate existing issues and pull requests. GitHub Projects’ was not designed with a specific methodology in mind, and provides a high degree of flexibility and customization. In this section of the learning module, we will learn how we can use GitHub Projects for Agile software development. We will learn how to create an Agile Board in GitHub Projects and how we can filter and group user stories in a spreadsheets. Lastly, we will lean how to plan iterations using the roadmap feature in GitHub Projects.
Create Labels
We will start off by creating a “user story” label that will be used to tag issues that represent user stories in our repository.
You can create labels for one repository only or you can add them to the default labels of your organization so that they are automatically added to all future repositories created in that organization.
To add labels to one repository only:
-
Navigate to an existing GitHub repository or create a new one for the purposes of this learning module.
-
Click the Issues button in the navigation bar

-
Then click the Labels button in top right corner.

To add default labels to your organization:
- In the top right corner of GitHub.com, click your profile photo, then click Your organizations.
- Next to the organization, click Settings.
-
In the “Code, planning, and automation” section of the sidebar, select Repository, then click Repository defaults.
- Click the New label button to create a new label and fill out the fields as shown below:
- Label name: user story
- Description: A label that indicates that an issue is a valid user story
- Color: any color that is not already used for another label

- Finally, click the Create label button to create the new label.
Repeat the steps above to create the task and spike labels:
- Task Label:
- Label name: task
- Description: A label that indicates that an issue is a task
- Color: any color that is not already used for another label

- Spike Label:
- Label name: spike
- Description: A label that indicates that an issue is a spike
- Color: any color that is not already used for another label

Repeat this process above and create 4 new labels detailed the different priority levels of the MoSCoW model as shown below:
- Must Have:
- Label name: must have
- Description: A label used on “Must Have” user stories
- Color: any color that is not already used for another label
- Should Have:
- Label name: should have
- Description: A label used on “Should Have” user stories
- Color: any color that is not already used for another label
- Could Have:
- Label name: user story
- Description: A label used on “Could Have” user stories
- Color: any color that is not already used for another label
- Won’t Have:
- Label name: user story
- Description: A label used on “Won’t Have” user stories
- Color: any color that is not already used for another label

Create Milestone
We will now add a milestone to our project to represent the first sync point.
Navigate to an existing GitHub repository or create a new one for the purposes of this learning module.
Click the Issues button in the navigation bar 
Then click the Milestones button in top right corner.
Click the New milestone button to create a new label and fill out the fields as shown below:
- Title: v1.0.0
- Due date: leave blank for now
- Description: The first milestone in this project representing the first stable release.
Finally, click Create milestone.
Create Templates
We will now create an issue template that we will use for the issues that represent user stories in our repository.
Click the Settings button in the navigation bar to view your repository settings. Scroll down and click the Set up templates button under Issues.

Click Add template and then select Custom Template from the dropdown menu.
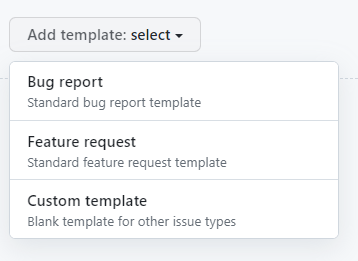
Next, click Preview and edit button adjacent to the custom template you just created. 
Click the pencil icon next to the title of your template to edit its fields. 
Fill out the fields as shown below:
- Template name: User Story
- About: A template that should be used when creating user stories in GitHub Issues.
- Description:
# User Story
- Provide a high-level detailed description of the user story from the perspective of the customer. Do not include implementation details in this section. Describe the feature, its behavior and the goal that it will help the user achieve.
- Answer the following questions:
  - Who are we building this for?
  - What are they trying to achieve?
  - What’s the overall benefit they’re trying to achieve? How does it fit into the bigger picture?
- You can use the following format for user stories: "As a <type of user>, I want to <perform some task> so that I can <achieve some goal>."

# Linked Tasks
- Enter linked tasks here using the # sign

# Estimation of Effort
- Provide an estimate of the amount of work that this user story will require to be completely and successfully implemented using the following estimation scale:
  - Not Specified
  - Trivial
  - Easy
  - Normal
  - Hard
- Try to avoid overthinking this process or spending too much time on estimation.
- The default option is "Not Specified" and you can leave it as such.

# Acceptance Criteria
- Describe the conditions that the software product must satisfy to be accepted by a user, customer or other stakeholder.
- The acceptance criteria should be testable and act as testing guidelines for developers.
- Acceptance criteria should use the following format: "Given (how things begin), when (action taken), then (outcome of taking action)."
- Labels: user story
Click the Close preview button after entering the required information.
Finally, click Propose changes and the click Commit changes to save the new user story template.

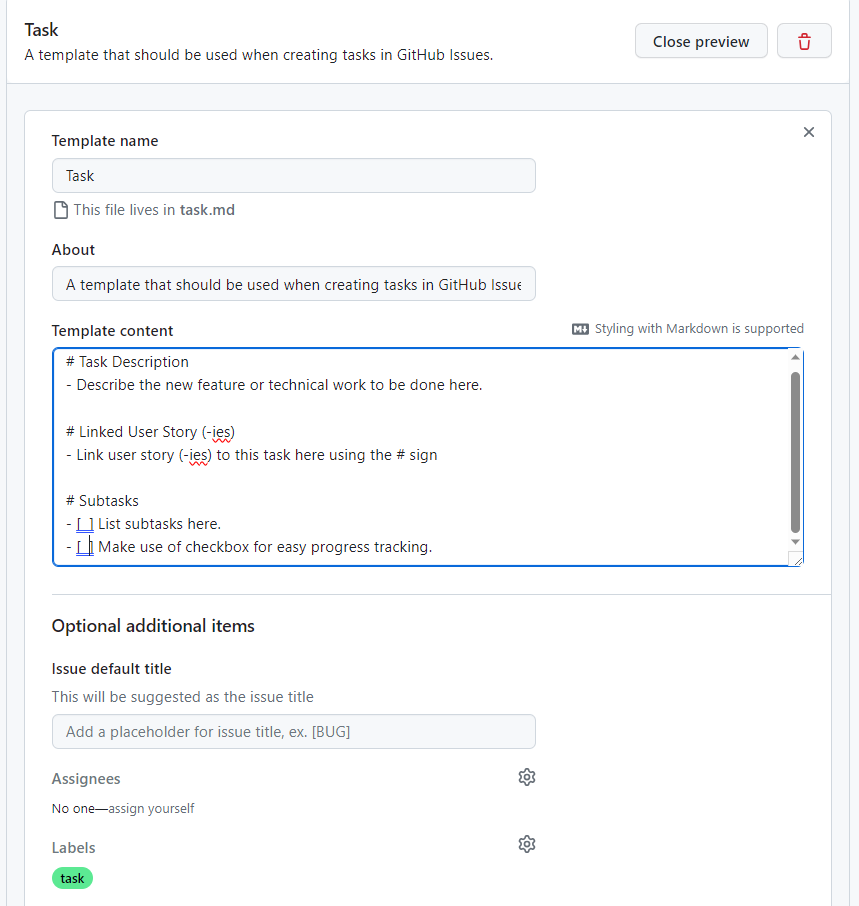
Repeat the process outlined above to create the task template with the following information:
- Template name: Task
- About: A template that should be used when creating tasks in GitHub Issues.
- Description:
# Task Description
- Describe the new feature or technical work to be done here.

# Linked User Story (-ies)
- Link user story (-ies) to this task here

# Subtasks
- [ ] List subtasks here.
- [ ] Make use of checkbox for easy progress tracking.
- Label: task
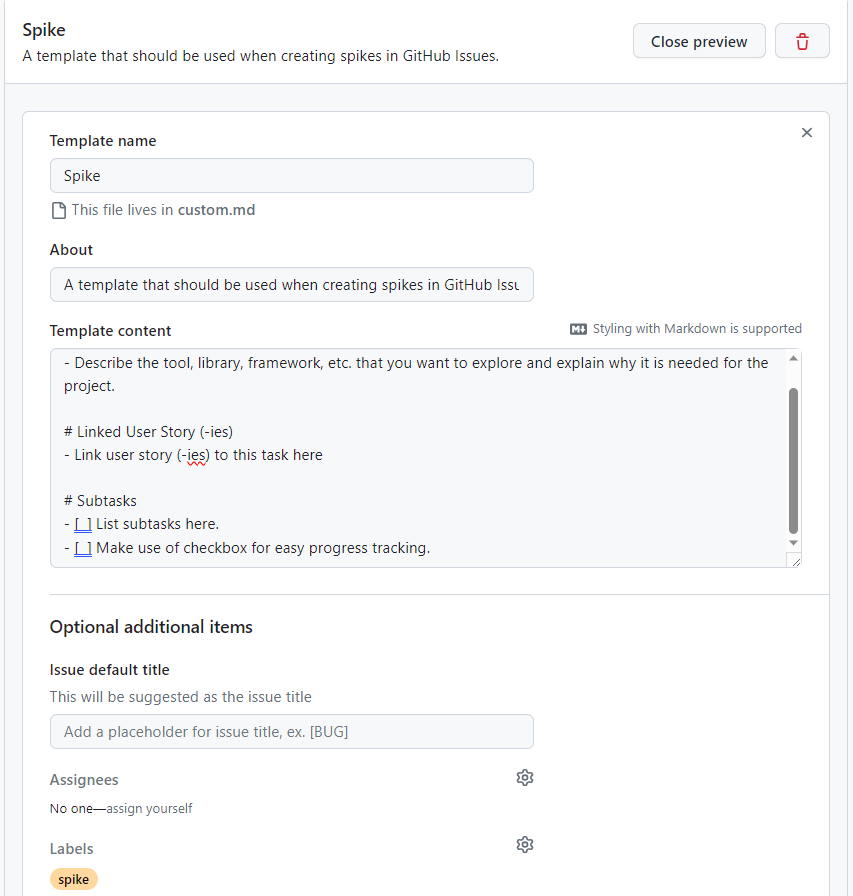
Repeat this process one final time to create the spike template with the following information:
- Template name: Spike
- About: A template that should be used when creating spikes in GitHub Issues.
- Description:
# Spike Description
- Describe the tool, library, framework, etc. that you want to explore and explain why it is needed for the project.

# Linked User Story (-ies)
- Link user story (-ies) to this task here

# Subtasks
- [ ] List subtasks here.
- [ ] Make use of checkbox for easy progress tracking.
- Label: spike
Create Pull Request Templates
We will now create the templates for feature pull requests and bug fix pull requests:
- Navigate to the Code tab of your GitHub repository
- Click the Add file button and select Create new file
- Enter
.github/PULL_REQUEST_TEMPLATE/feature_pr_template.mdin the name field - Add the following content to the file
### Feature Description
- Describe the new feature here.

### Expected Behavior
- Describe the expected behavior here.

### Test Cases
- [ ] Detail the test cases you used.
- [ ] Make use of checkboxes to help the developers who is doing the testing keep track of their progress

### Additional Information
- Describe the addition changes/steps you took, for example the SQL commands used for adding a column in database table.
- Click commit changes to the save the file.
Repeat the process above to create the bug fix pull request template using the following information: File name: .github/PULL_REQUEST_TEMPLATE/bugfix_pr_template.md File content:
# Bug Fix Title

### Issue Description
- Describe the issue here.

### Steps to Reproduce
- Provide a step-by-step guide to reproducing the issue.

### Expected Behavior
- Describe the expected behavior here.

### Solution/Fix Description
-Describe what approaches are taken to fix/mitigate the issue.

### Test Cases
- [ ] Detail the test cases you used.
- [ ] Make use of checkboxes to help the developers who is doing the testing keep track of their progress

### Additional Information
- Describe the addition changes/steps you took, for example the SQL commands used for adding a column in database table.
When creating a pull request, add the following query parameter to the URL to use one of the templates above:
?template=feature_pr_template.md?template=bugfix_pr_template.md
Create a New Project
Now that we created the user story label and template, we can proceed to create a new project in GitHub Projects.
Click the Projects button in the navigation bar of your repository, then click the downwards-facing arrow next to Link a project and select New project from the dropdown menu. The Link a project button will change to New project. Click the New project button.

In the pop window, select Board from the left pane. Enter a name for your project and then click Create.
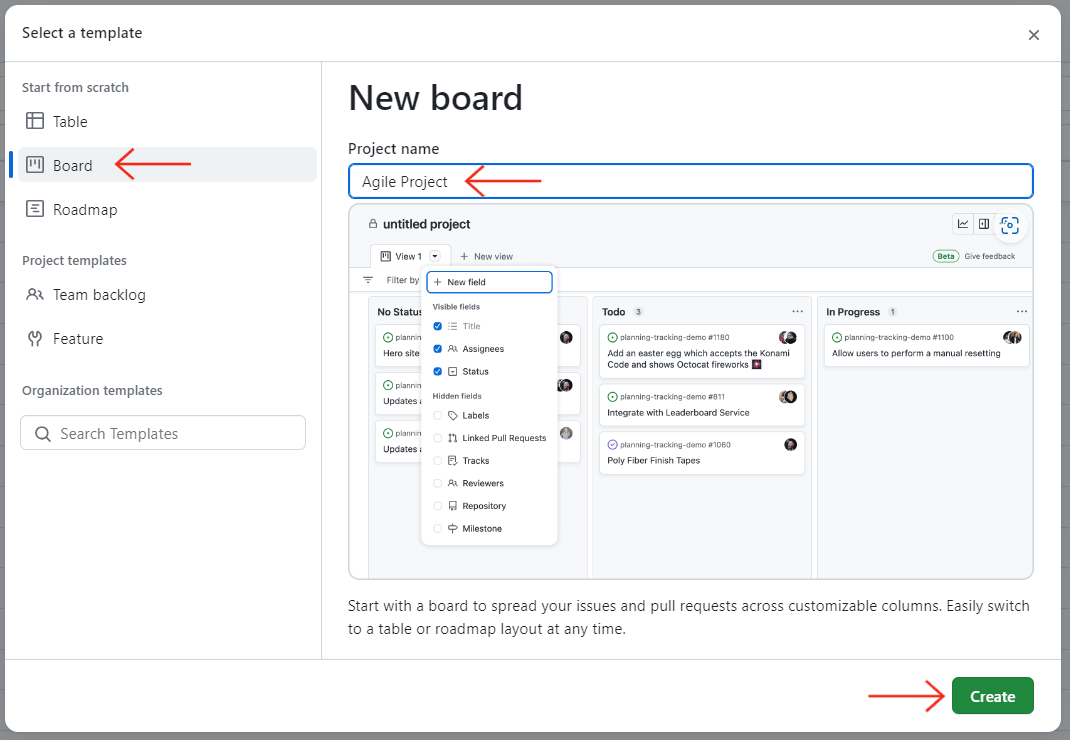
Your project board is now created. Make sure to rename View 1 to Board.
| Default Name | Updated Name |
|---|---|
 |  |
The default board in GitHub Projects will have three containers: Todo, In Progress and Done.
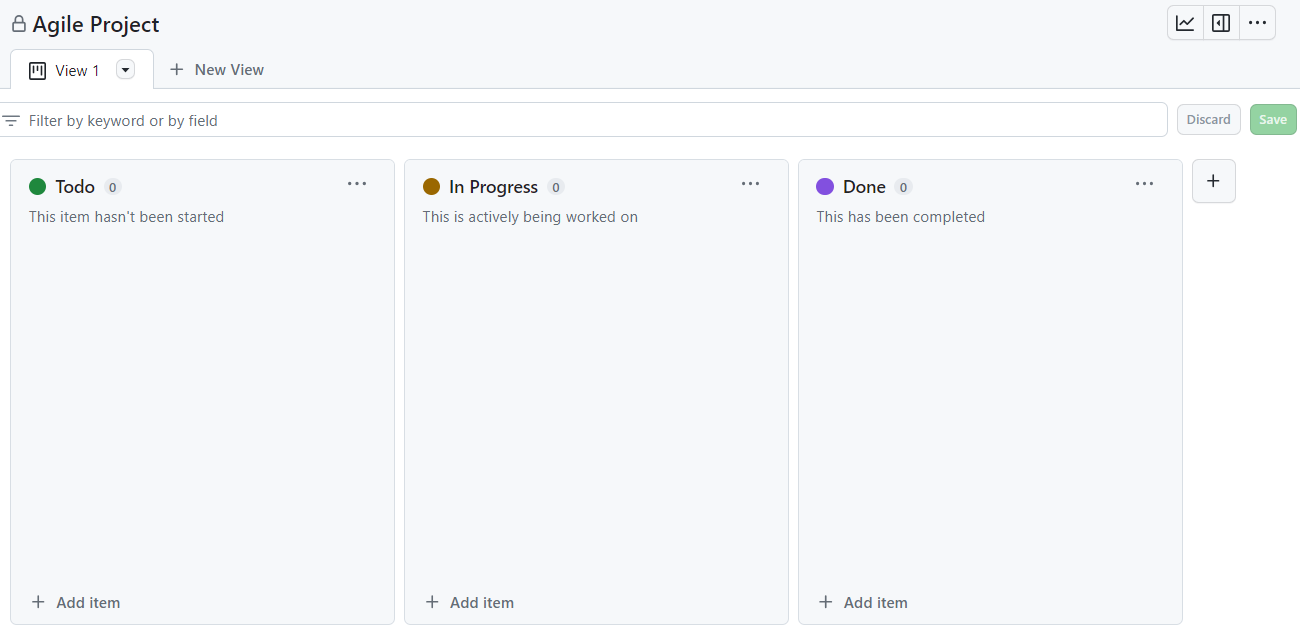
Add New Containers
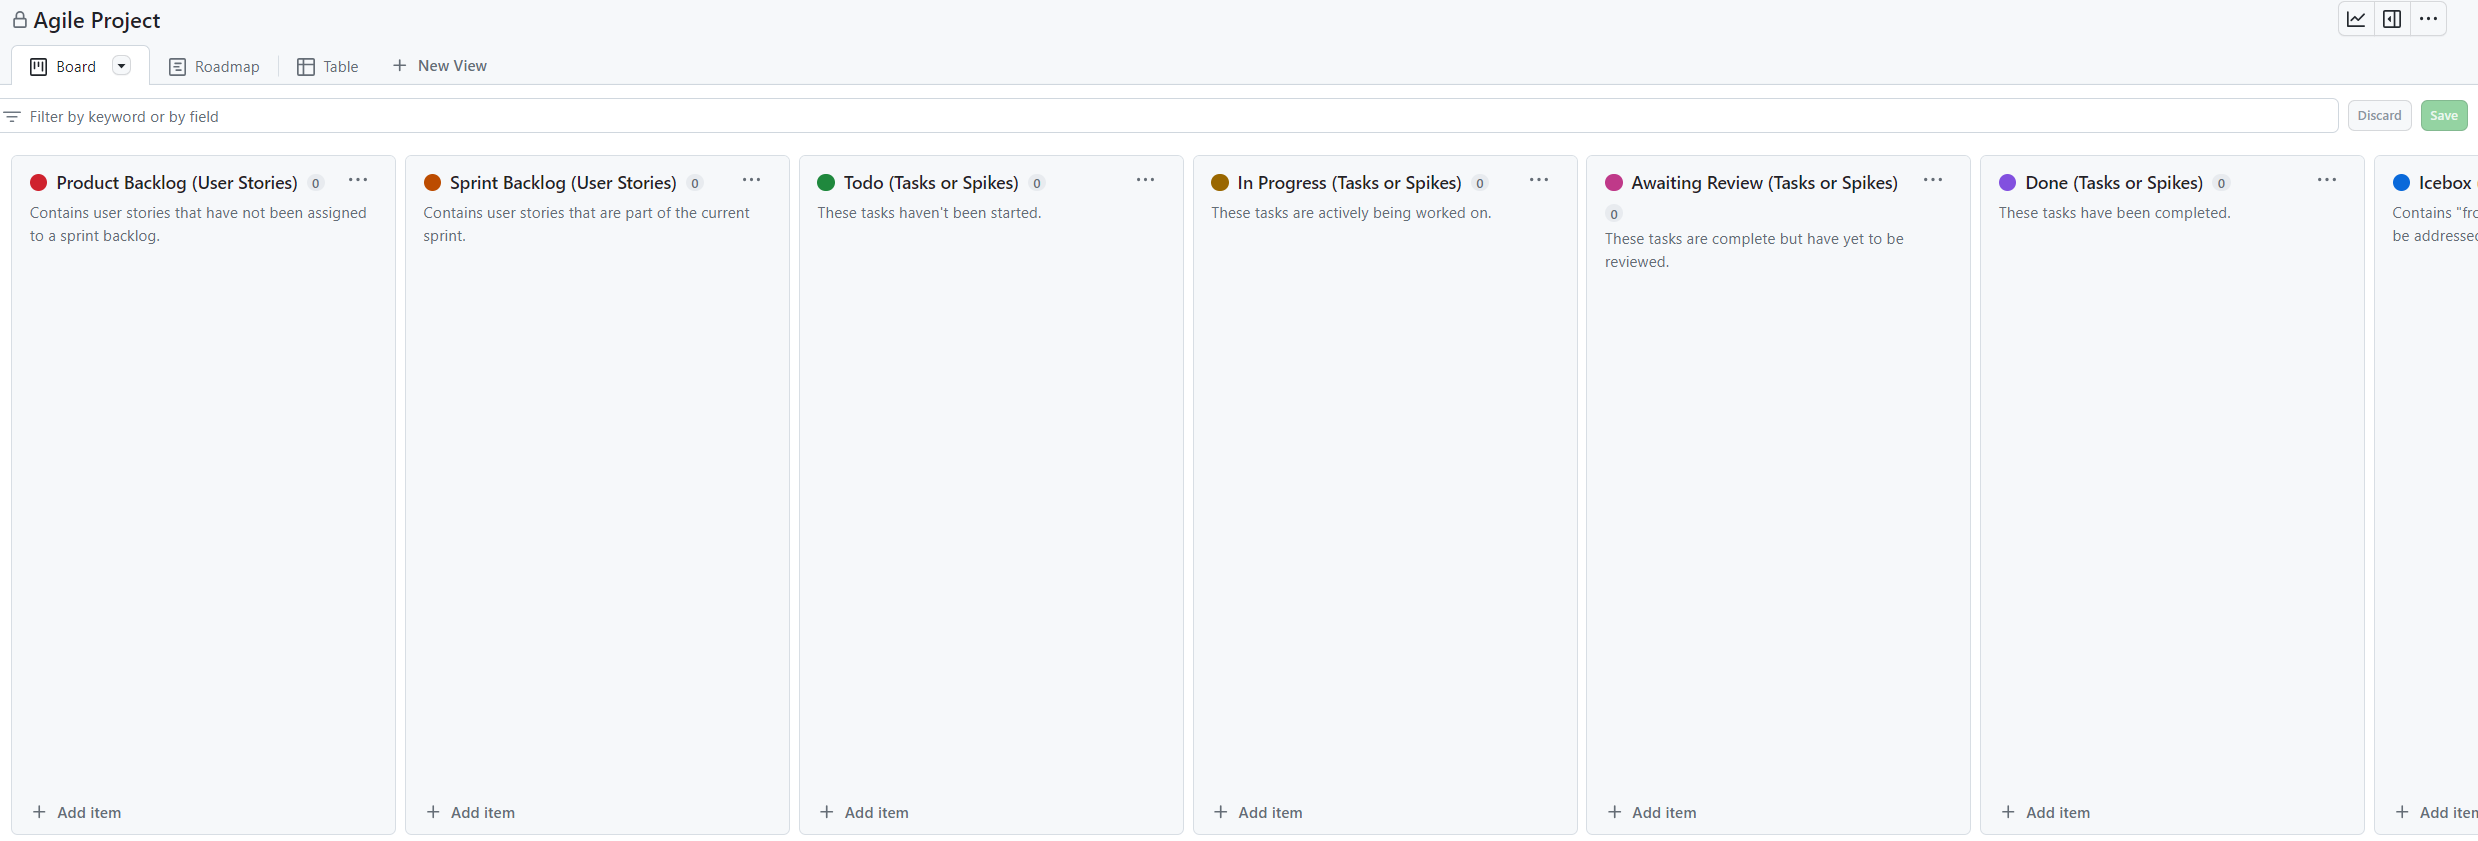
As described in the previous section, an Agile Board should have 7 containers: Product Backlog, Sprint Backlog, Icebox, Todo, In Progress, Awaiting Review, Done.
Click the + button next to the Done container to create a new container.

Next, click New Column an fill the form in the popup window. We will start by creating the Product Backlog container. You may want to include the kind of items that belong in each container in parentheses after the container name to help team members distinguish the different containers.
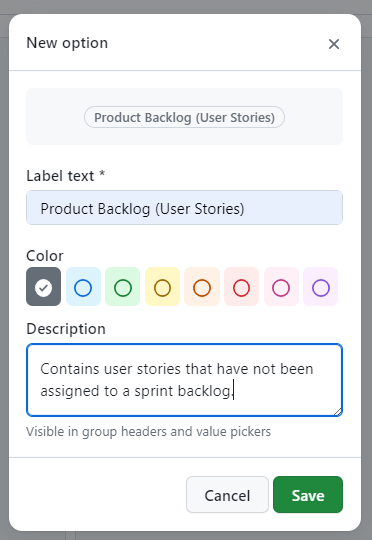
You can modify an existing containers by clicking the three ellipses next in the top right corner of a container and then selecting Edit details from the dropdown menu.
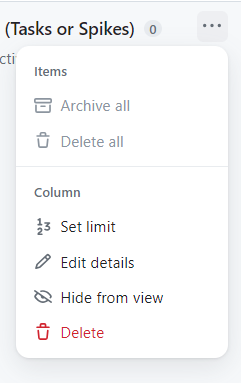
Repeat the process outline for each one of the seven containers and enter the information below:
- Product Backlog
- Label text: Product Backlog (User Stories)
- Color: Red
- Description: Contains user stories that have not been assigned to a sprint backlog.
- Sprint Backlog
- Label text: Sprint Backlog (User Stories)
- Color: Orange
- Description: Contains user stories that are part of the current sprint.
- Todo
- Label text: Todo (Tasks or Spikes)
- Color: Green
- Description: These tasks haven’t been started.
- In Progress
- Label text: In Progress (Tasks or Spikes)
- Color: Yellow
- Description: These tasks are actively being worked on.
- Awaiting Review
- Label text: Awaiting Review (Tasks or Spikes)
- Color: Pink
- Description: These tasks are complete but have yet to be reviewed.
- Done
- Label text: Done (Tasks or Spikes)
- Color: Purple
- Description: These tasks have been completed.
- Icebox
- Label text: Icebox (Tasks or Spikes)
- Color: Blue
- Description: Contains “frozen” user stories that may or may not be addressed in the future.
You can click on a container and drag it to rearrange the order of the containers. Your final Agile Board should look something like this:
(Optional) Add Completed Container
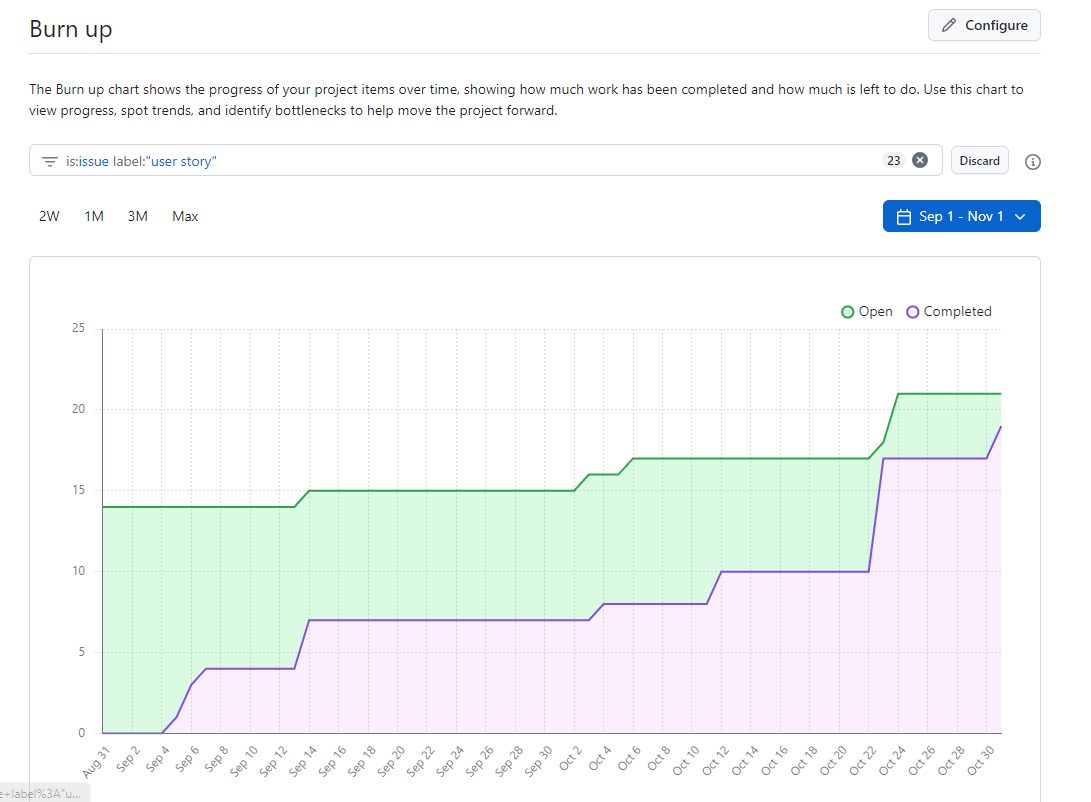
GitHub Projects provides an “Insights” feature that allows the user to create reports and graphs. The default report that is included in the “Burn up” report that shows the progress of your project items over time. This chart can be used to view progress, spot trends, and identify bottlenecks to help move the project forward. It might be beneficial to customize this chart to compute the burn rate of your user stories. However, the “Insights” reports do NOT include archived items. As such, if you plan on using this feature, you should not archive completed user stories. Instead, you can create a new Completed (User Stories) container that houses closed user stories.
To create the Completed container:
Click the + button next to the Icebox container to create a new container.
Next, click New Column an fill the form in the popup window:
- Label text: Completed (User Stories)
- Color: Gray
- Description: Contains user stories that have been completed.

Finally, click the Save button.
Following this change, you will be able to move completed and closed user stories at the end of an iteration instead of archiving them. Note that you can still archive completed tasks or spikes.
Add Roadmap
Now that our board is ready, we will create an alternate view in GitHub Projects for our roadmap. Click the New View button next to the Board tab and select Roadmap from the dropdown menu.
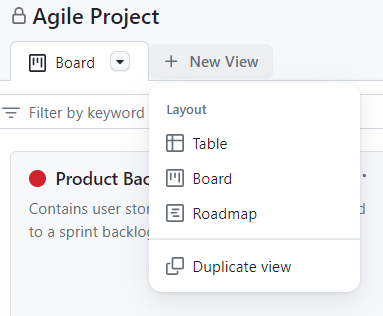
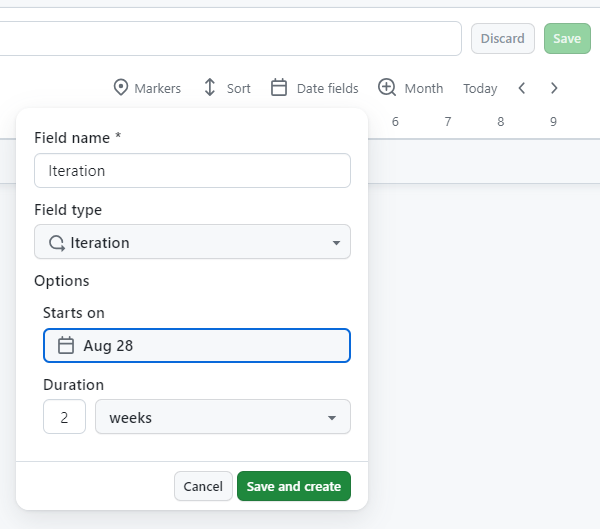
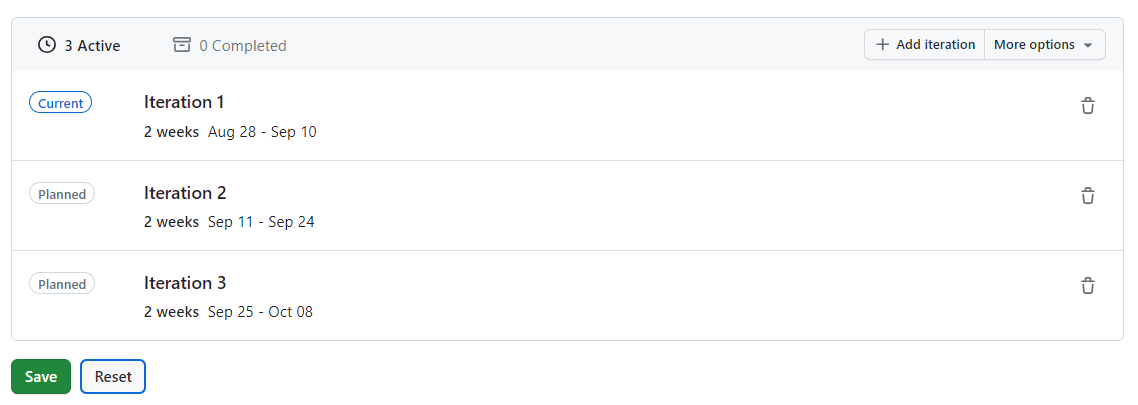
Rename the new view to Roadmap. Next, click on the Date fields button in the top right corner of the new view and select New field. Enter Iteration in the Field name box and select Iteration as the Field type. Select the date on which your iteration should start and its duration in weeks. Finally, click on Save and create.
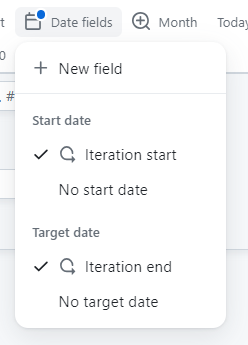
You will now need to select the date fields by clicking on Date fields and selecting Iteration Start and Iteration End for the Start date and target Date respectively and clicking on Save.
Add Table
We will now create our final view which contains a spreadsheet-like table. Click the New View button next to the Board tab and select Table from the dropdown menu.
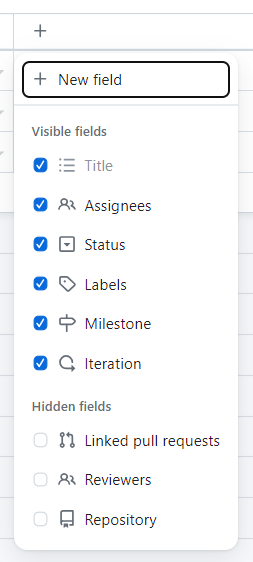
Rename the new view to Table. Click the + button next to the Status column and check Labels, Milestone and Iteration to display these hidden fields and click Save.
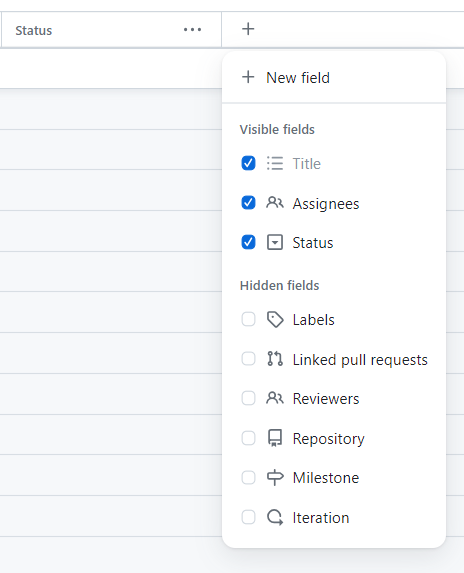
You can show or hide fields in the future as needed.
Disable “Item Closed” Workflow
The default workflows in GitHub Projects automatically move closed issues to the “Done” container. While this may be useful for closed tasks, closed user stories should remain in your Sprint Backlog until the end of the iteration. As such, it makes sense to disable the “Item Closed” workflow.
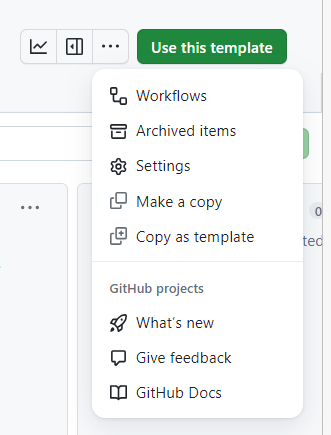
- In the top-right corner of your project, click the ellipses button to open the menu.
-
Select Workflows from the dropdown menu.
- Under Default workflows, select Item closed.
-
Click the blue toggle in top-right corner to turn it off

Save the Project as a Template
Now that we completed our GitHub Project setup, we will save it as a template so that we can reuse it in future projects.
Open the project settings page by clicking on the the three ellipses in the top right corner and select Settings from the dropdown menu.
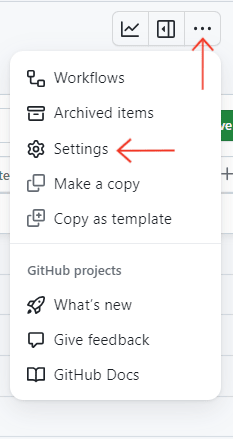
Under the Templates category, click on the Copy as template button.
In the popup window, select the Owner, enter a Project name and then click on Copy as template.
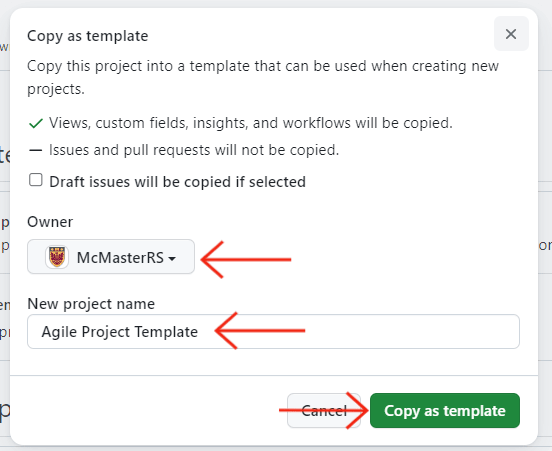
Your template is now saved as its own project. Do not use this template project as a real project. Leave it at this stage, so that you can always copy it and use that copy as a starting point for future projects.
Note that you may need to update the iteration field for future projects that use this template to select a different start date or duration.
To edit the iteration on a future project that uses this template:
- Navigate to your project.
-
In the top-right, click the three ellipses to open the dropdown menu.

- In the menu, click Settings to access the project settings.
- In the list on the left, click the name of the iteration field you want to adjust.
- From this page, you can add or remove iteration as need.
Create an Example User Story
Now that our template is ready, we will explain how we can use it according to the proposed Agile workflow we devised in the previous section.
After meeting with your client(s) and/or stakeholder(s) and gathering your user stories and epics, you will need to enter the collected user stories into GitHub as issues using the the template we created earlier.
You can create new issues in one of two ways:
-
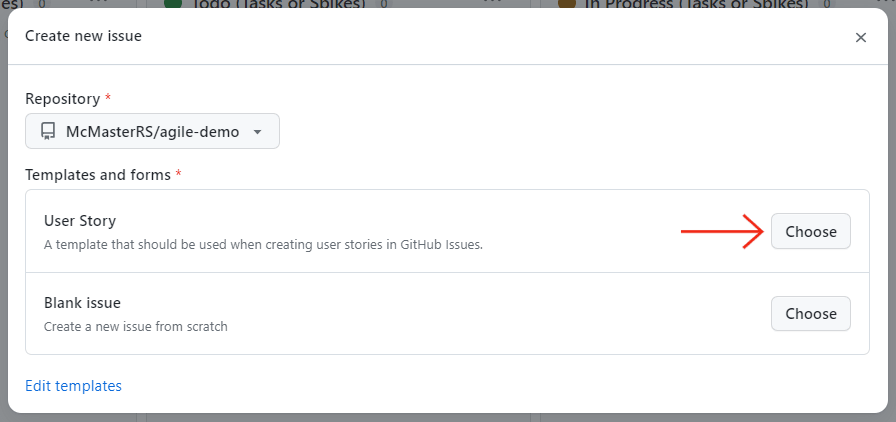
Navigate to the Issues tab of your GitHub repository and click the New Issue, then click the Get started button adjacent to the User Story template.

-
From the Agile Board, click the Add Item button at the bottom of the Product Backlog container, then enter a pound sign (#) and select your GitHub repository. You will be presented with a Create new issue option, click that button and new popup will open. Click the Choose button adjacent to the User Story template.

We will now create an example user story. For the purposes of this learning module, we will create a user story centered around adding single sign-on using MacID credentials.
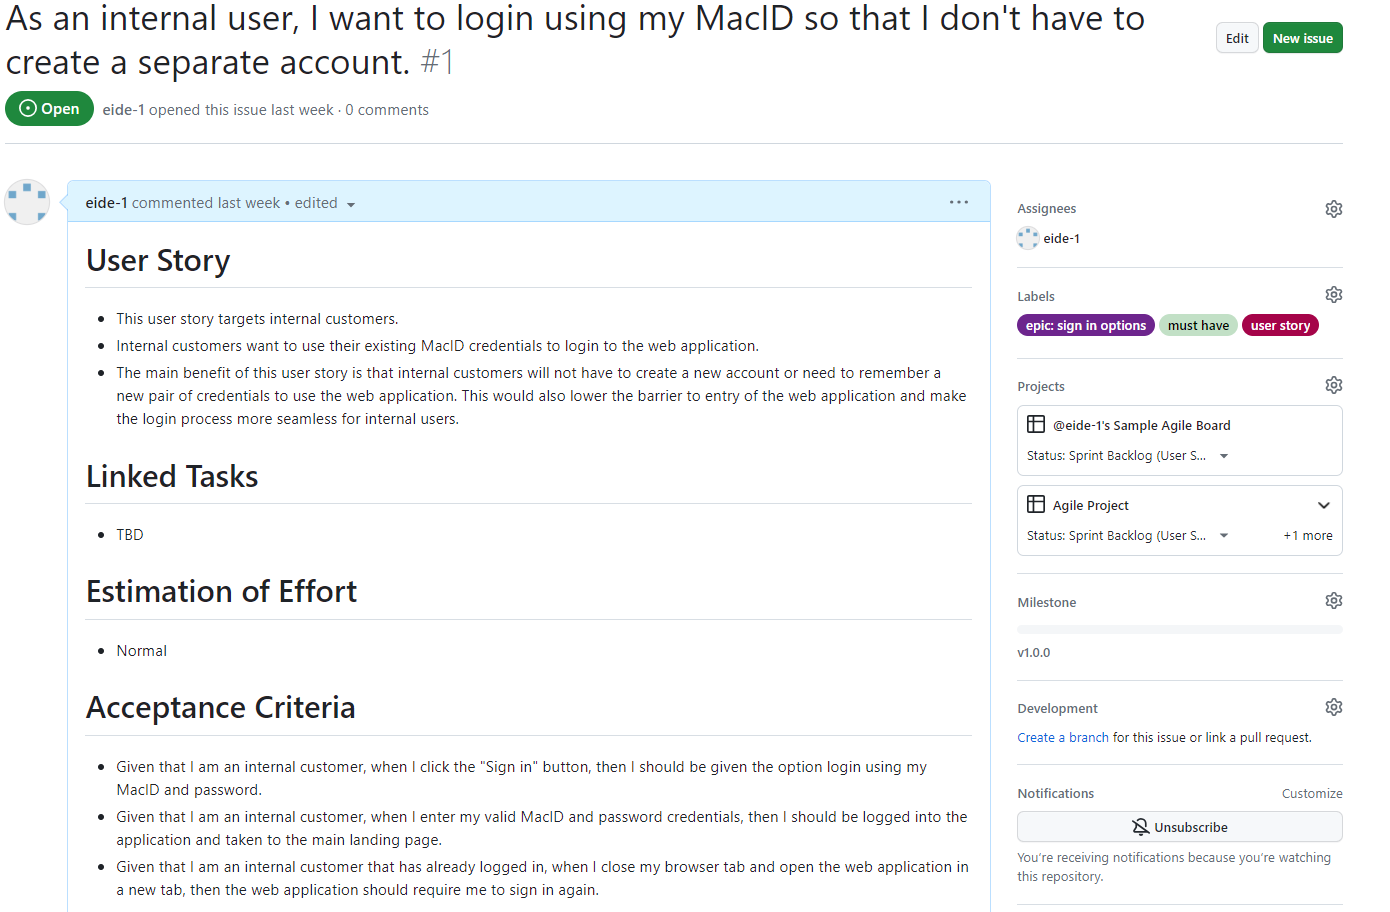
The title of the user story follow the format proposed in the previous section: “As an internal user, I want to login using my MacID so that I don’t have to create a separate account.”
Next, fill out the body of the user story. The text provided below is an example of the information to include in this section:
# User Story
- This user story targets internal customers.
- Internal customers want to use their existing MacID credentials to login to the web application.
- The main benefit of this user story is that internal customers will not have to create a new account or need to remember a new pair of credentials to use the web application. This would also lower the barrier to entry of the web application and make the login process more seamless for internal users.

# Linked Tasks
- TBD

# Estimation of Effort
- Normal

# Acceptance Criteria
- Given that I am an internal customer, when I click the "Sign in" button, then I should be given the option login using my MacID and password.
- Given that I am an internal customer, when I enter my valid MacID and password credentials, then I should be logged into the application and taken to the main landing page.
- Given that I am an internal customer that has already logged in, when I close my browser tab and open the web application in a new tab, then the web application should require me to sign in again.
In the “User Story” section, we answered the primary questions outlined in the user story template, we also included a basic estimation of effort as well as the acceptance criteria.
Make sure to add the “user story” label to this issue. Furthermore, given that this user story relates directly to the security of our web application and since we cannot ship a web application that does not meet the minimum security requirements, we classified this user story as a “Must Have” as shown by the label.
This user story represents a feature that should be part of the first stable release, click on Milestone in the right side bar and select v1.0.0.
Our user story is part of a bigger epic that centers around giving customers multiple sign in options to accommodate both internal and external users. The epic is defined in an external Word document as shown below:

We will now create a label for this particular epic. We recommend using the same color for all epic label and keeping their names relatively short. We also encourage developers to use the following naming convention for epic labels: epic: <title>.
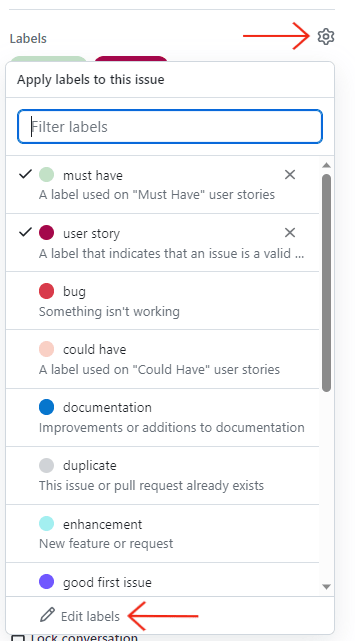
To create additional labels from the user story page, click the gear icon on the right and then select Edit labels from the dropdown menu, then click New label and fill out the name, description and color fields.
We entered the following information for our epic:
- Label name: epic: sign in options
- Description: Give users multiple sign-in options
- Color: #6D258D
Click Create label after entering the label information.
Finally, go back to the user story and the newly created epic label.
Add Another User Story
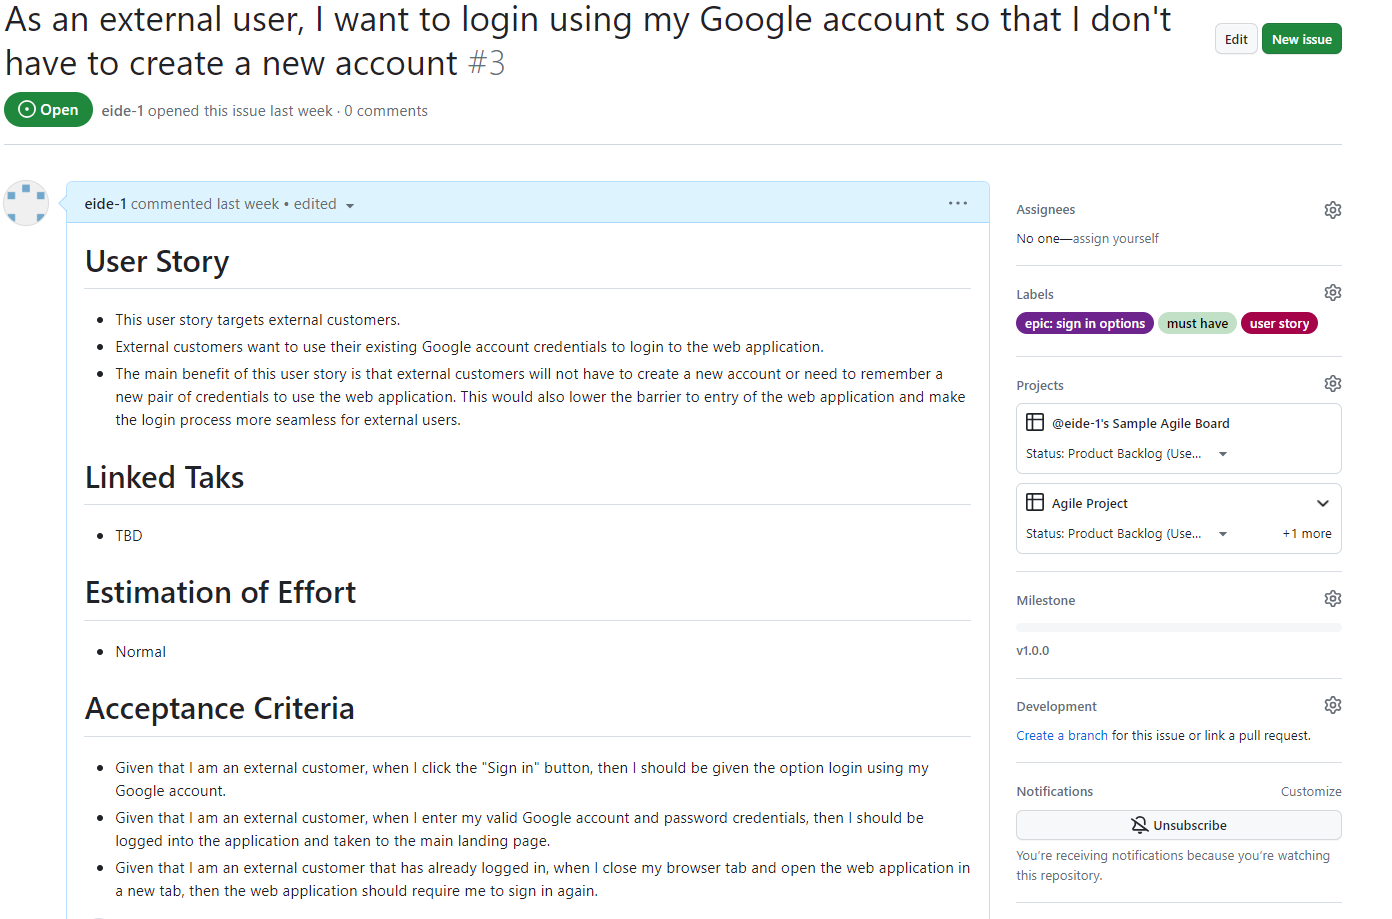
Repeat the steps above and create another user story that centers around giving external users the ability to sign into the web application using their Google account.
We recommend using the following title: “As an external user, I want to login using my Google account so that I don’t have to create a new account”.
Add the following description to the body of the user story:
# User Story
- This user story targets external customers.
- External customers want to use their existing Google account credentials to login to the web application.
- The main benefit of this user story is that external customers will not have to create a new account or need to remember a new pair of credentials to use the web application. This would also lower the barrier to entry of the web application and make the login process more seamless for external users.

# Linked Tasks
- TBD

# Estimation of Effort
- Normal

# Acceptance Criteria
- Given that I am an external customer, when I click the "Sign in" button, then I should be given the option login using my Google account.
- Given that I am an external customer, when I enter my valid Google account and password credentials, then I should be logged into the application and taken to the main landing page.
- Given that I am an external customer that has already logged in, when I close my browser tab and open the web application in a new tab, then the web application should require me to sign in again.
Make sure to tag the user story with the “user story”, “must have” and “epic: sign in options” labels and the v1.0.0 milestone.
Add User Stories to Agile Board
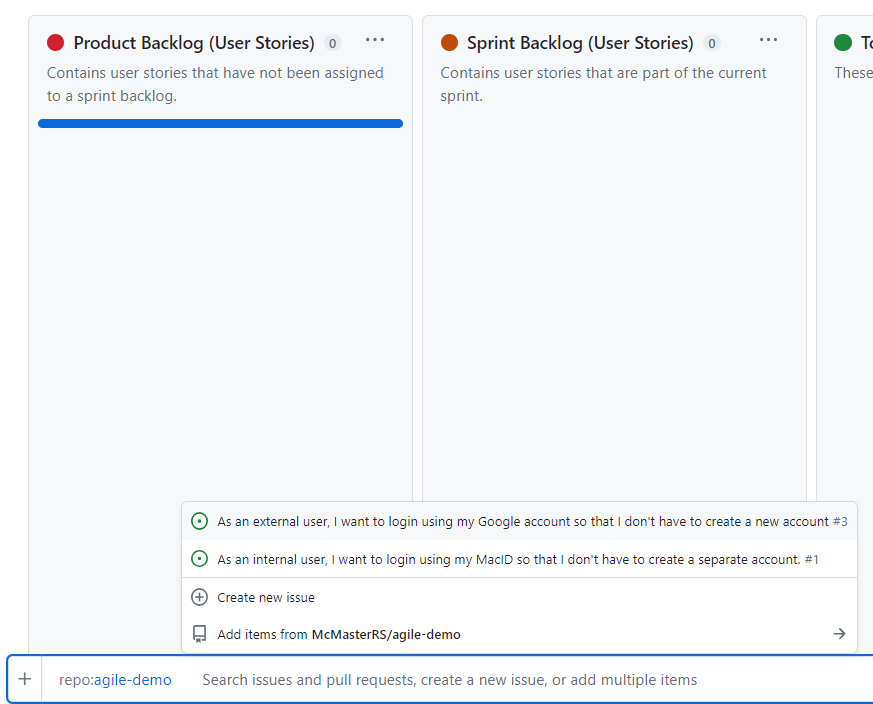
Open your GitHub Project and click Add item button at the bottom of the Product Backlog container. Next, enter a pound sign (#) and select your GitHub repository and select the two user stories we just created from the menu.
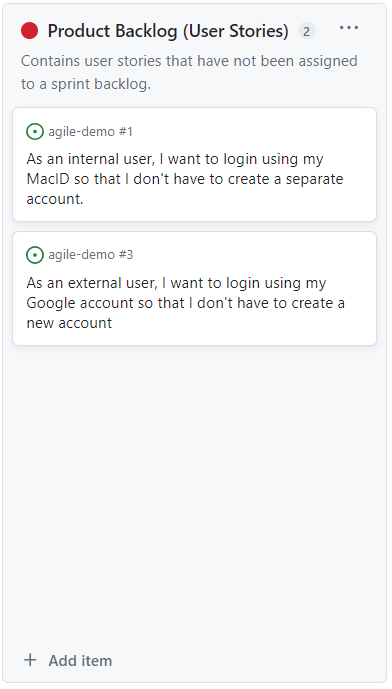
Your Product Backlog container will now look like this:
Populate Sprint Backlog
When you are ready to start development on your project, you will need to select a set of user stories to work on in the first sprint. Starting with high priority (i.e., “Must Have”) user stories is often recommended, but you should also consider the dependencies between the different user stories. For example, if completing a user story is a blocker for a set of other user stories, then it may be beneficial to complete that user story first, so that you can address the other dependent user stories in future sprints. If during this assessment process, you encounter issues that you want to freeze, make sure to move them to the Icebox container on the Agile Board.
Our current product backlog is very simple, so we will start off by moving the MacID single sign-on user story to the spring backlog container by dragging it to the proper container.
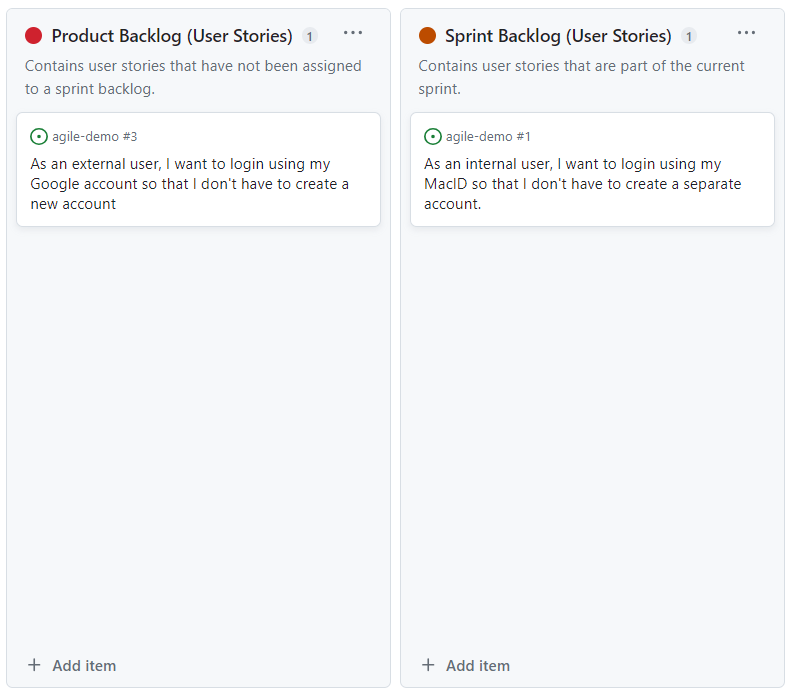
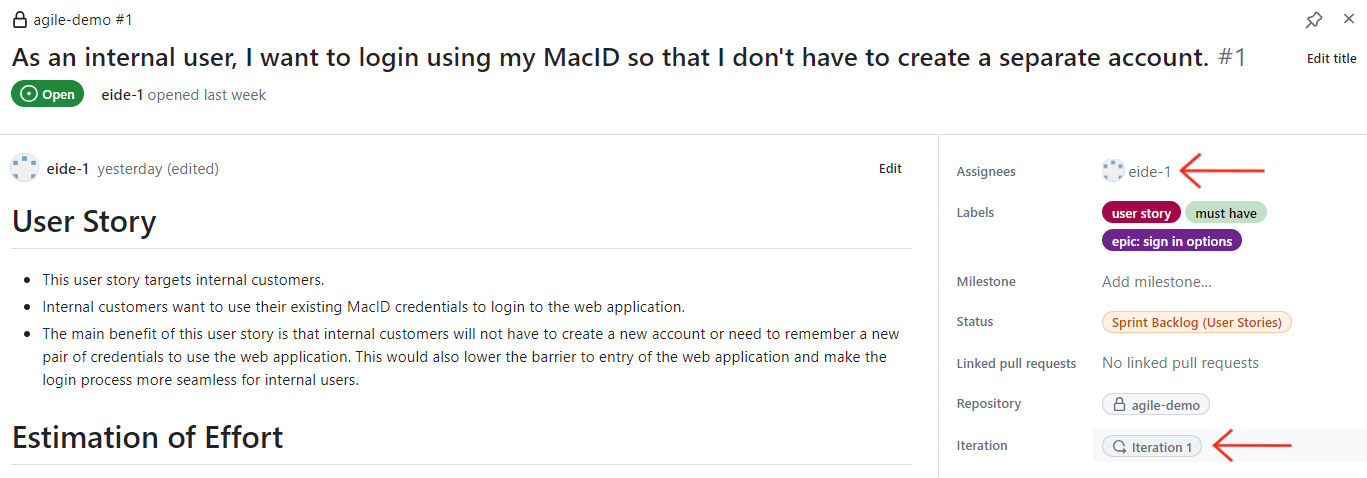
You can click on a user story in your sprint backlog and assign a developer and an iteration (i.e. sprint) to it.
Create Tasks/Subtasks from User Stories
Developers should create tasks and/or subtasks for each user story in the current sprint backlog. Tasks can then be converted into an issue and subsequently a pull request that will reviewed and merged once ready. Note that not every task or subtask needs to be turned into an issue. You can usually a single comprehensive task that gets converted an issue an then a merge request and several associated subtasks. We will now detail the process of splitting our MacID single sign-on user story into tasks and subtasks as an example.
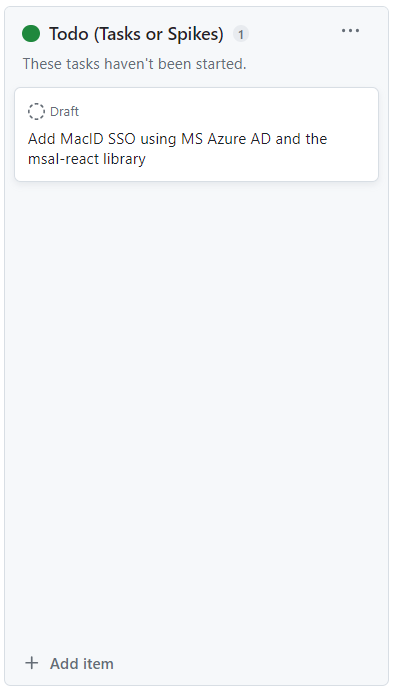
Click the Add item button at the bottom of the Todo container and add the following task (without selecting a repository using the # sign): “Add MacID SSO using MS Azure and the msal-react library”. Notice that tasks can use technical lingo and do not need to be written from the customer’s perspective.
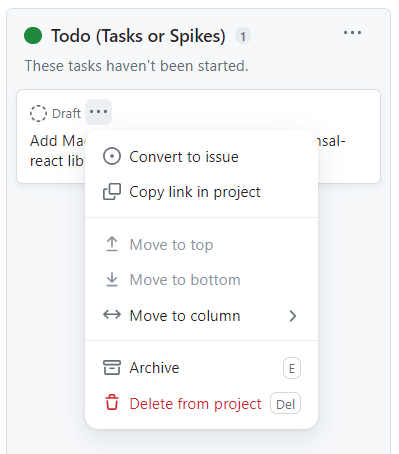
We will now convert our primary task into an issue by hovering on the task card, clicking the ellipses button and selecting Convert to issue from the dropdown menu and finally selecting the appropriate repository.
Next, click on the task card in the container and assign a developer to it as well as an iteration. Click the Edit button and enter / (forward slash) in the text box that appears.
Select Templates from the dropdown menu
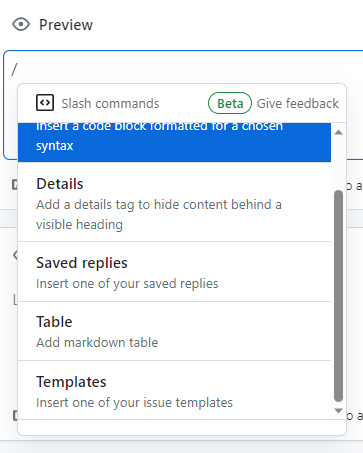
Select Task from the dropdown menu to load in the task template.
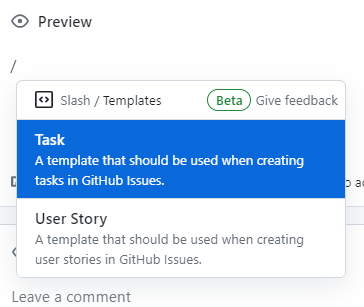
Update the task body with the following information:
# Task Description
- Add the ability to sign into the web application using valid MacID credentials
- We will be using the `msal-react` library to enable SSO using MS Azure

# Linked User Story (-ies)
- #1

# Subtasks
- Register SPA in MS Azure AD
- Create environment and authentication configuration files
- Wrap template in `MsalProvider` component
- Create `SignInButton` and `SignOutButton` components
- Create `PermissionGate` component to check if a user is signed in or not
- Create the Microsoft Graph client helper
- Update existing pages to be restricted unless a user is logged in
Notice that we linked a user story by entering a pound sign (#) and then selecting the user story from the dropdown menu. The user story number may be different for you.

Make sure to tag the issue with the task label we created earlier.
Remember to go back to the user story and update the Linked Tasks section as shown below:
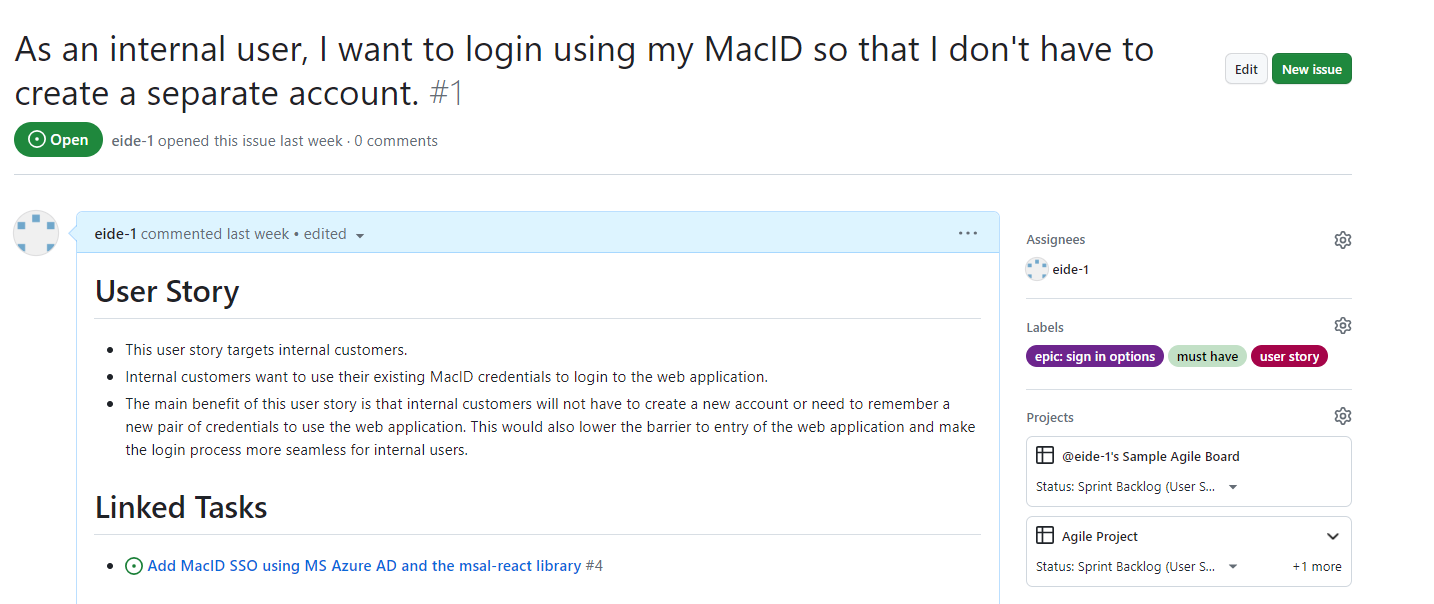
Move Tasks through Containers
Once a developer starts working on a task, they will create a branch with the desired changes.
The task should be moved through the containers according to the following progression track:
-
When a developer starts working on a task, they should move its card to the In Progress container.
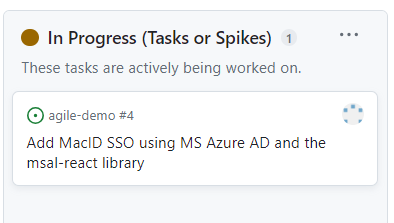
- When the developer is done working on a task, they should create a pull request:
- Go to the Pull Request tab on their repository, clicking on New pull request.
- Select the source branch
- Add
?template=feature_pr_template.mdor?template=bugfix_pr_template.mdto the URL and hit the Enter key to reload the page - Click Create pull request
- Fill out the Title and the Body of the pull request
- Click Create Pull Request
-
Link the pull request to the task by opening the pull request clicking on Development in the side bar and selecting the task.
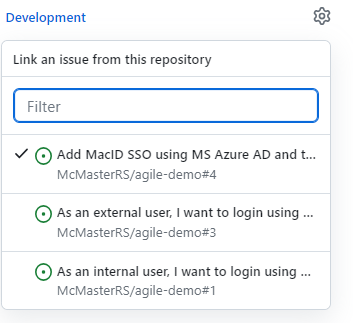
- Add Reviewers and Assignees to the pull request
-
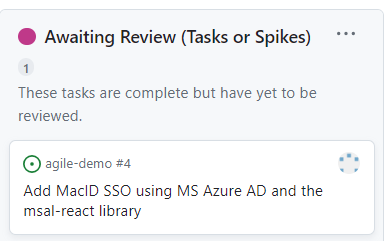
Move the task card to the Awaiting Review container
-
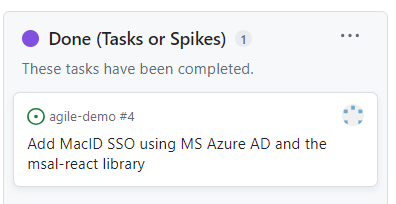
When the pull request has been tested and approved, the task card should be moved to the Done container and the developer in charge of this task should also close it (i.e., close the issue in GitHub).
- Once all the tasks that are part of a user story are done, the user story issue should also be closed.
Using the Roadmap View
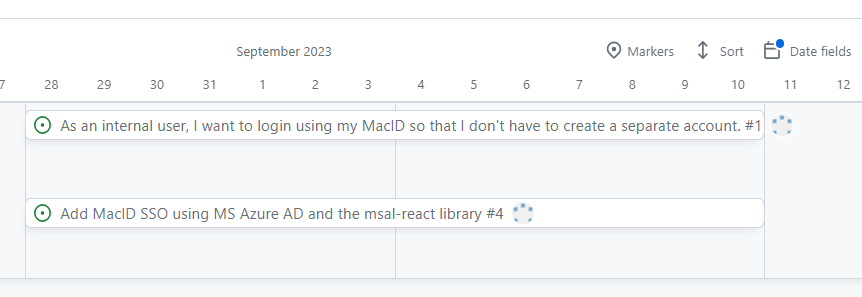
The Roadmap view allows you to view the user stories and tasks that are part of the current iteration in a calendar view.
Using the Table View
The Table view functions like a spreadsheet and allows to search for particular user stories and tasks or filter according to different attributes like the current status, label, milestone, etc.
You can add or remove fields from the table view using the + button in top right corner of the table.
Additionally, you can use the search box above the table to find particular user stories or tasks. For instance, the query below returns all the “Must Have” user stories that in the Product Backlog.

Wrapping Up an Iteration
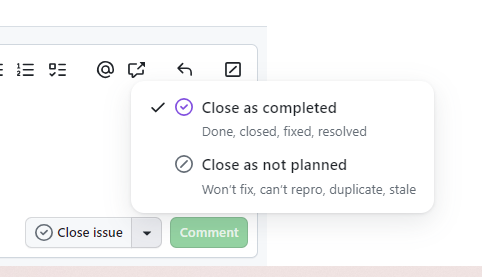
An iteration is complete after its assigned duration has elapsed and all the user stories in the Sprint Backlog are closed. Note that you can close a user story by clicking on it and then clicking on the Close Issue button. Make sure that Close as completed is selected from the dropdown menu.
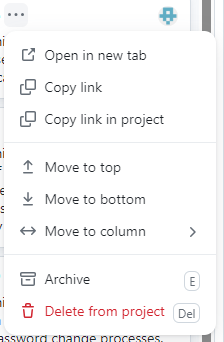
If you do not plan on using the “Insights” feature (and thus did not create a Completed container), you can archive a user story by clicking the three dots next to its title and number and selecting Archive from the dropdown menu.
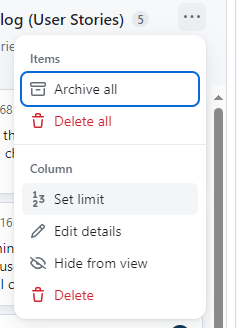
If all the user stories in your Sprint Backlog are completed you can archive all of them by clicking on the three dots button in the top-right corner of the Sprint Backlog container and selecting Archive all.
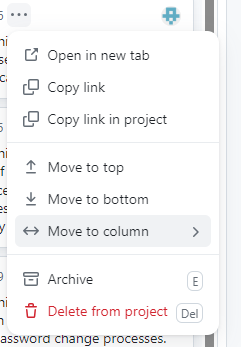
Alternatively, if you have a Completed container, you can move completed user stories to this container by dragging and dropping them or by clicking the three dots next to a user story’s title and number and selecting Move to column from the dropdown menu. Finally, select Completed (User Stories) from the list of containers and the user story will be move to that container.
At the end of an iteration, the team should meet to assess the work done during the current iteration. Ideally, all user stories in the current Sprint Backlog should be completed at this point. Nevertheless, if the team is left with incomplete user stories in the Sprint Backlog, then can be addressed in the following sprint or moved back to the Product Backlog or Icebox if the user requirements have changed.
The meeting at the end of an iteration is also a great opportunity for the team to assess their progress on a project and identify any weak points and modify their methodology or strategy accordingly.
Insights
GitHub Projects provides an “Insights” feature that allows users to generate helpful reports and charts.
To access the Insights page, click the Navigate to insights button in the top-right corner of your project.

The Insights page includes the Burn up chart by default. By default, this charts includes all items (i.e., user stories, tasks and spikes). If you want to view the burn up chart for user stories, simply add the following query to the Filter by keyword or by field box: is:issue label:"user story". The aforementioned query restricts the chart to issues that are marked with the user story label.
